**GET PERSONALIZED GOLF COACHING AT THE GOLF TYKOON! www.patreon.com/TheGolfTyKoon
**TO BOOK AN IN-PERSON GOLF LESSON WITH ME go to www.s2golfacademy.com/book-online
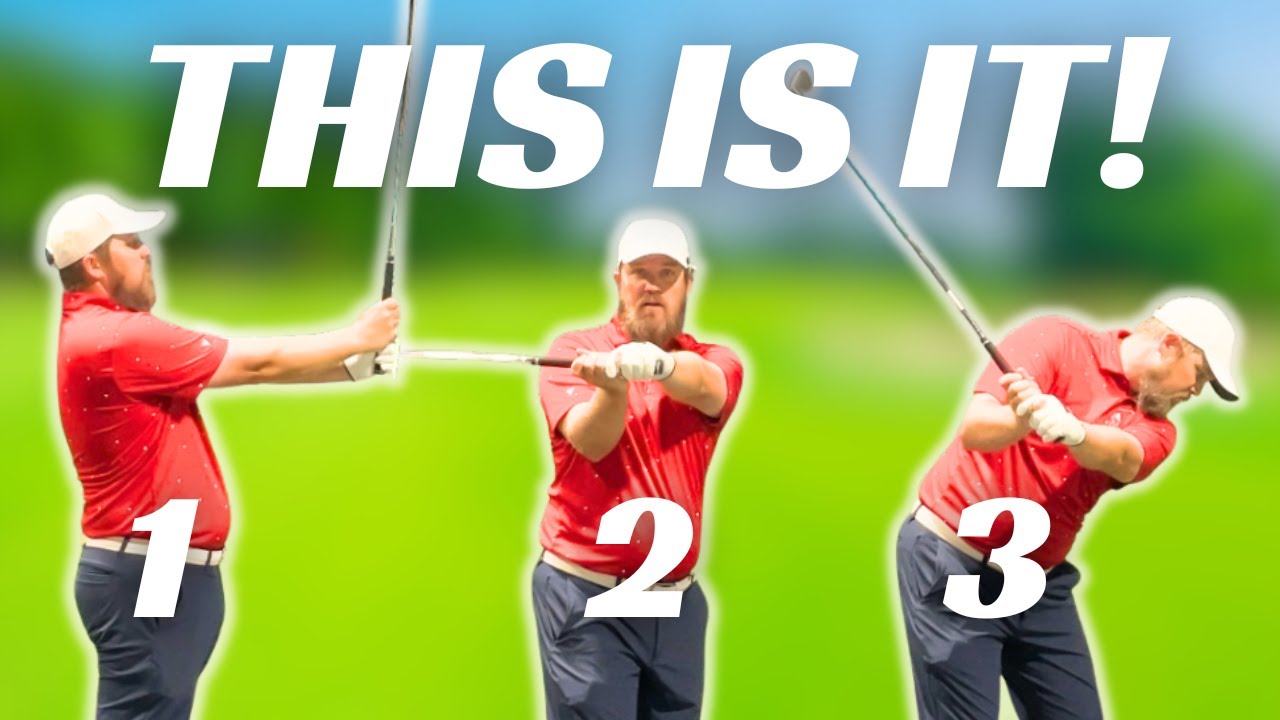
Want to swing the golf club like your favorite tour pro? In this video, I reveal my 3-Step Backswing System that every golfer needs to generate more speed in the golf swing, strike the ball first, and control shot shape like a tour player. Most amateur golfers struggle with their arm structure in their golf swing and don’t even realize what their arms should be doing. That’s because many golf instructors don’t teach this critical concept the right way.
This is my proven 3-Level Backswing System — used by golfers of all skill levels:
Beginner Level: Build foundational structure in 3 distinct steps.
Advanced Level: Learn to blend these 3 steps into a repeatable golf swing.
Tour Level: Take the 3 steps to the course to make your golf swing function like a tour player!
This drill helps you move your arms properly around your body, improving swing path, low point control, and overall ball-striking. If you want to take your swing to the next level, this step-by-step guide will show you how to train like a tour pro—even if you’re just getting started.
Key Moments:
0:00 – Introduction
0:31 – “The System”
0:59 – Thanks Rob!
1:22 – Tour Pro Comparison
1:50 – How Arm Structure Can Help You
2:00 – The 3 Levels
2:16 – Beginner Level: Step 1
3:29 – Beginner Level: Step 2
3:57 – Beginner Level: Step 3
4:18 – Beginner Level: All 3 Steps
4:45 – Advanced Level: Step 1
5:42 – Advanced Level: Step 2 & 3
6:15 – Advanced Level: All 3 Steps
6:34 – Tour Level: All 3 Steps
7:30 – Free Practice Plan
🔔 Subscribe for more golf swing drills, backswing tips, and online golf lessons designed to make you a better golfer—fast.
#GolfTips #GolfDrills #BackswingDrill #GolfBackswing #ImproveYourGolfSwing #GolfInstruction #GolfSwingTips #GolfTraining #BallStriking #HitTheBallFirst #GolfLessons #SwingSpeed #GolfCoach #TourProSwing #GolfFundamentals #OnlineGolfLesson #GolfArmStructure #3StepDrill #GolfLikeAPro #LowerScores #FixYourSwing #GolfForBeginners #GolfPracticeDrill #GolfYouTube #GolfHack #GolfHelp #AmateurGolfers #BetterGolf #GolfSetup #GolfSwingFix #Golf #Golfer #Golfing #StackandTilt #GridLife #EverybodyTilts #GolfPro #GolfSwing #PGA #PGATour #LPGA #GolfSwingBasics #GolfBackswing
See what I did there? If you didn’t know what you were looking for, you probably missed it. But it’s what’s causing most golfers to hit wildly crazy and inconsistent shots with no progress. Most golfers have no idea how to move their arms in their golf swing, back swing or down swing. Most videos as well as coaches usually focus more on rotation, but that’s just surface level stuff. After 19 years of coaching, I’ve built a three-step back swing system that helps show golfers how to move their arms around their body, strike the ball with consistency, and a lot more power. Make sure to like, comment, subscribe below so you don’t miss out on any content. Stick around to the end of the video to grab my complimentary practice plan so that you can actually start practicing with a purpose and lower your scores. I want to thank a mentor and a friend of mine by the name of Rob Cheney. Without Rob’s help and toutelage, I wouldn’t be the coach that I am today. Thank you, Rob. If you don’t follow Rob, click this link above. Subscribe to Rob’s channel. He does a fantastic job at delivering golf content and instruction. If you watch golf swings from today’s best players, Tiger Woods, Nelly Corda, Tommy Fleetwood, Rory Mroy, Champion Store players like Alex Chica, former Tour Pro turn coach Grant Weight. They all have some very similar arm structure throughout their golf swings. And these are things that the average golfer needs to learn to put into their own golf game. The reason being, they’re going to strike it more solid. They’re going to hit the ball further, and they’re going to be able to control their curve. All three are necessary to play good golf. There’s three levels to my three-step system. There’s beginner, advanced, and tour level. All three use the same three steps, just either segmented one by one, or they start to blend them. We’re going to start with the beginner level and get right into it. Step one of my three-step system. Beginner level one. We’re going to start off and we’re going to take our setup. Once you have your setup and your distance from the ball established, we’re going to stand straight up, point your arm straight out in front of you at shoulder height. From here, we’re going to hinge the club up. We’re then going to rotate the shaft parallel to the ground. And when I do that, I’ve maintained the Lshape in my wrist. Pay attention to what my right arm does. In order to lay this shaft down, my right arm actually flexes a tiny bit and sits below my left. This is the exact amount of arm bend that we want out of your golf swing at the top of the back swing. The average tour pros right arm is never bent as much as the average amters. The wider we can keep this, the straighter I can keep my left arm. Now, as we look at this, you can see that the face is pointed towards the sky. I want to take my left wrist here, and I want to flex it away from me just a little bit. As you can see, that twists the club face here and actually closes it to the shaft. This helps provide more of a draw. So, this is step one is we’ve just built the arm structure for what your arms need to be at the top of your back swing. From here, step two, we pivot 90 degrees. My right leg’s going to straighten. My shoulders are going to turn approximately 90 degrees. My hips are going to turn at least 40, maybe more. That’s okay. Once I have this position, we don’t play golf from here. So, we have to side bend by bending the left knee and crunching the left side of our body so that I can actually swing down towards the ground. Step three is swing down and hit the ground in the same spot over and over. I don’t recommend doing this with a ball at first. I recommend you doing it slowly like I just demonstrated and learning where we strike the ground so that you know how far away from the ball you really need to stand. So, I’m going to demonstrate this now with a golf ball. We’re going to take our setup distance from the ball set. Stand up. Hinge at 90°. Arm straight. Lay it down. Flex the wrist. Step two. Pivot. Bend the left knee. Regain the incline. Step three, swing down. Make contact. Decent contact. Pretty straight. Level two is our advanced level. And this is where we start blending pieces together. So, we take our setup and instead of standing up to build our arm structure, we’re going to build our arm structure down here from our forward bend. And the way we do this is we kick the club shaft back. Notice my hands are staying under my shoulder. They’re not moving away. They’re not moving in. They’re staying right under my shoulder. I hinge the club backwards so that it’s parallel to the ground. I should see a 90° motion and it should feel like my lead wrist is flattened. It’s gone from here to here and the face should point slightly down. In doing so, my right wrist has to kick backwards and my elbow has to bend a little bit. Otherwise, I’d never get the club parallel to the ground. The right arm has to bend a little bit. So, we set the arm structure shaft parallel. From here, now I can turn, tilt, and extend my spine, create my back swing. Step three, swing down, make contact with the ground. You start slow. figure out where you’re hitting the ground that sets your distance from the ball. As you progress with this, this is the easier one to do to blend this into your golf swing, but I still recommend make plenty of practice swings in order to get this correct. Let’s demonstrate. Set up distance from the ball. We’re going to set the hands, build the arm structure, turn, tilt, extend, and then hit it. pretty straight tiny draw. That’s level two of my three-step system. Level three or my tour level of the three-step system is blending this all together. And just like anything, you should start slow, build this till you’re comfortable feeling the movements, and then hit a shot. If you can’t do it slow motion, you need to do it until you can do it over and over slow motion and then actually start swinging full speed. So, I use this when I warm up. Take my setup. We’re going to go slow. I’m going to create the movements with the shaft, the wrist. As I turn, tilt, and extend my spine because I’ve built this from the ground up. I know what it needs to feel like. It’s just happening at the exact same time. Slow. Set the arms as we go back. Nice and high. Tiny draw every single time. If you liked this video, make sure to like, comment, subscribe below so you don’t ever miss out on any good golf content. To get access to my complimentary practice plan, you need to go to my Patreon server link down below. join as a free member and then click the icon that says free practice plan. It won’t cost you anything, but it’ll give you a structure when you go to the golf course or you go to the driving range to actually work on your golf game in a manner that will get you better instead of just blindlessly going to the driving range and making golf swings with no intent. I thank you guys for allowing me to teach you today. You guys have a great one. I’ll see you next time on the Golf Tycoon.


2 Comments
Great stuff coach!
If this video helped you, make sure to leave a comment and send to a friend!