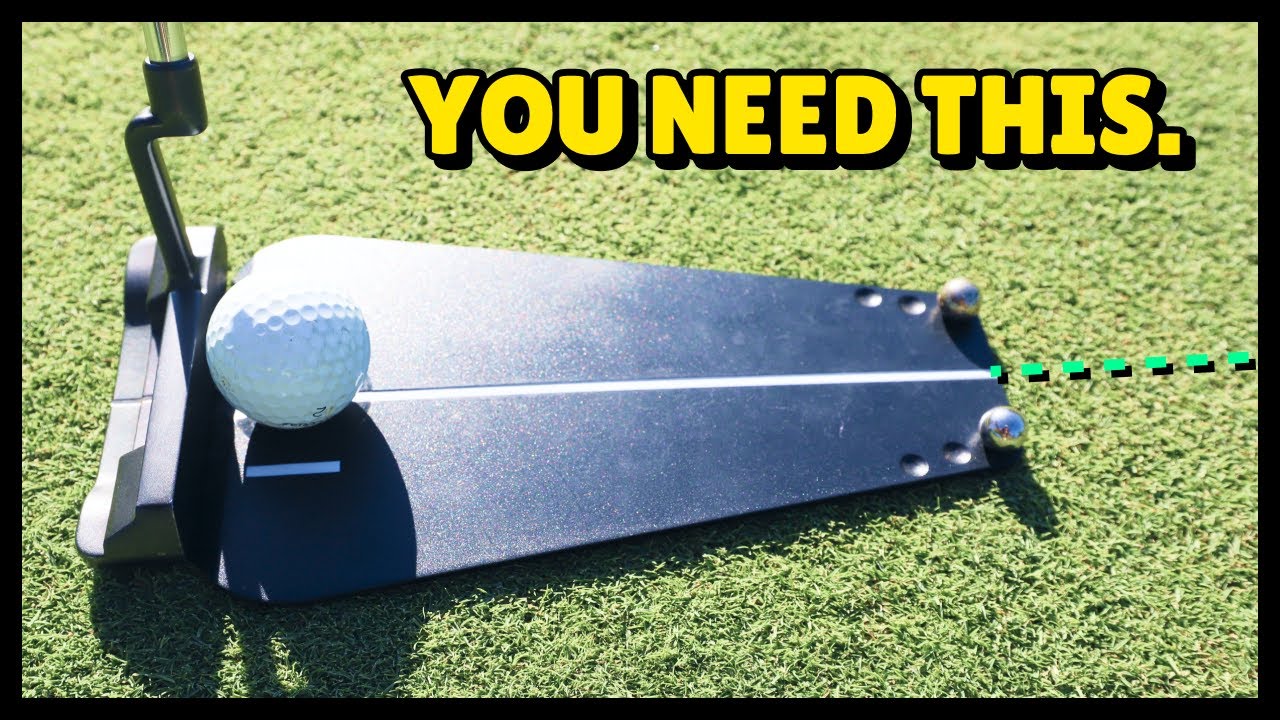
The Pelz Putting Tutor is my favorite putting training aid. I’ve used this for over a decade and swear by it. Here are my top tips for using it effectively.
Get the putting tutor on Amazon:
https://geni.us/putting-tutor
Read my full review:
https://www.thediygolfer.com/reviews/pelz-putting-tutor-review
0:00 Intro
0:56 How to use the putting tutor
1:30 Initial setup
2:41 Eye positioning
2:54 Breaking putts
4:58 My top 4 tips for using the putting tutor effectively
what if I told you that if you use this putting training aid that’s in my hand right now for 5 to 10 minutes before your next round you could drop 3 to five Strokes pretty much instantly golf is full of bogus claims just like this one but here’s the thing I don’t think it’s actually bogus because I’ve used this thing over and over again you can even see with the The Fray packaging right here I’ve had it for many years and I’ve seen lots of competitive and amateur golfers alike use this thing and drop Strokes immediately in this video I’m going to show you what this thing is all about how to use it effectively and how it’s going to help your game but before we get into it I’m Zach from the DIY golf.com where it is my goal to help you shoot your lowest round ever let’s jump [Music] [Applause] [Music] in one of my favorite things about The Putting Tutor is how simple it is in my opinion the simpler the training aid the better this thing comes with a case Marbles and the putting plate itself which has two little slots or actually it has three different settings for the marbles and then it has a little Peg on the bottom that kind of helps it stay in place um it does not come with the ball with red stripes that you might see on the Amazon listing you may have seen that just wanted to make that clear um but anyways to set this thing up you’re first going to choose your difficulty setting I recommend starting on the easy setting and then working your way to the pro setting and eventually you should be practicing almost exclusively on that Pro setting to get the absolute most out of this device once you’ve chosen that setting it’s time to line it up I recommend starting with a perfectly straight and ideally flat or uphill putt we want this to be about 4 to 7 ft you could even do it a little bit shorter if you want do this in practice and even on the practice screen before round because it’s a great way to get warmed up and calibrated when you’re first starting out on this device you’ll find that it takes quite a few putts before you’re able to consistently hit it through the marbles when I first started using it I was shooting in the high 70s and it took me over an hour on the pro setting before I started getting it through pretty consistently so it’s not easy not easy whatsoever so have some patience and also be sure sure to use the white lines on the plate standing over the ball you should be able to see both of them if not that means that your eyes are either too far inside or too far outside of the ball and ideally you want your eyes directly over the ball or some guys like Phil Michelson prefer to have your eyes slightly inside the ball um but definitely not outside so after you’ve hit a few straight putts it’s time to work on breaking putts if you’re bad at Green reading this device is going to get you in shape fast in his book every shot counts Mark Brody found in his Strokes gained analysis on amateurs that on average amateurs Miss around 70% of their putts on the low side of the hole Dave pels the creator of this device The Putting Tutor has suggested even higher numbers ideally we want our misses to be about 50/50 which means we’re not consistently making the same mistake of under or over reading every time most golfers misread their putts and then they’ll compensate by pushing or pulling the putts sub subconsciously they may have a good putting round once in a while but will lack consistency uh in the long run as a result of this one of the great things about The Putting Tutor is that it’s going to force you to read your putts correctly we know that putting is a function of speed and break the faster the pace of the putt the less break we need to play the slower the pace the more break we have to play so as you’re aiming and setting up this device I recommend placing a t left or right of the hole depending on what type of putt you’re hitting so that you can aim the tutor and start seeing that proper amount of Break um I recommend rolling a few balls underhand to get an idea of how much the putt breaks at different speeds um it’s just easier to kind of get it set up and then you’ll place the tea down uh aim The Putting Tutor at it hit some putts and you’ll have to make a few adjustments until you have kind of locked in on both that speed and the amount of break that you’re playing I recommend spending about 5 to 10 minutes on each type of putt you’ll do a straight putt left to right and right to left and keep them all kind of in the 4 to 7t range and if you want to make it a little bit harder with those braking putts try to adjust the aim and see if you can make it with different speeds that is a pretty good challenge but it will really help you with your green reading and your touch all right so we’ve gone through the B Basics Here and Now I want to leave you with a few tips um that I’ve kind of come up with over using this uh many years to get more out of this so my first and most important tip is to be patient and remember what the goal is here the goal is to train your eye alignment see the true break of a putt and learn to match your green reading with the pace that you hit your putts while practicing you’ll hit those marbles off several times furthermore you’re probably going to make it through the marbles in still miss several putts because of either the incorrect speed uh or maybe even an imperfection in the green my second tip is to use this indoors during the winter set it up in your basement hit a few straight putts every night you’re going to be amazed at how much this can impact your game and then my third tip is to avoid using this on rough putting surfaces this is kind of a more Universal rule that I have for myself I generally don’t like to practice on super bumpy greens because it can really just kind of erode your confidence pretty quickly um and then one last thing um kind of a public service announcement here you’ll see that in the video I’m standing on a towel so if you’re going to be hitting the same putt for a long period of time be sure to throw a towel down or even better take off the golf spikes throw on some flip-flops or some tennis shoes um and save the grass underneath you I know the grounds Keepers will be uh very appreciative at your local cour if you do that so just a little tip there um and that’s about it I’ll leave a link to this device in the video description so you can check it out if this video is helpful I’d appreciate a thumbs up on it subscribe to the channel and if I missed anything you have any questions leave those as comments below and I’ll try to respond hit them straight and I’ll see you in the next video


![[야차골프] 제주도대장은누구? 순수아마추어 골프유튜버 오장내기 노멀리건.빽티.꿀잼 블루밍골프투어 [야차골프] 제주도대장은누구? 순수아마추어 골프유튜버 오장내기 노멀리건.빽티.꿀잼 블루밍골프투어](https://www.fogolf.com/wp-content/uploads/2025/11/1763376369_hqdefault.jpg)


3 Comments
I’ll have to try this and see if it works for me!
Really good video thank you!
Thanks for explaining how to use it in real training. Another dude gave a hasty review and said after hitting 10 balls his stroke wasn’t any better. Gave up after 10 balls.
It looks like it could help.