Sir Nick Faldo rebuilt his swing with David Leadbetter over a two year period and then went on a Major streak. This 4 part series shows you all of the fundamentals that Nick Faldo worked on to develop that Major winning swing that would hold up under all the Major pressure.
In this video (Part 1) Nick works on his grip, posture, alignment and takeaway or backswing. These are the setup fundamentals that made Nick Faldo’s swing so repeatable.
This video is from an old VHS tape called Nick Faldo’s Golf course
PART 1: https://youtu.be/LjVr_SFK0FI
PART 2: https://youtu.be/Eky7KtAWbRQ
PART 3: https://youtu.be/2GrXZ78r-gc
PART 4: https://youtu.be/sSHB4XyGiP0
Bonus Material: https://youtu.be/5WQJB9Doymo
00:00 Introduction
00:44 The Grip
04:13 Alignment
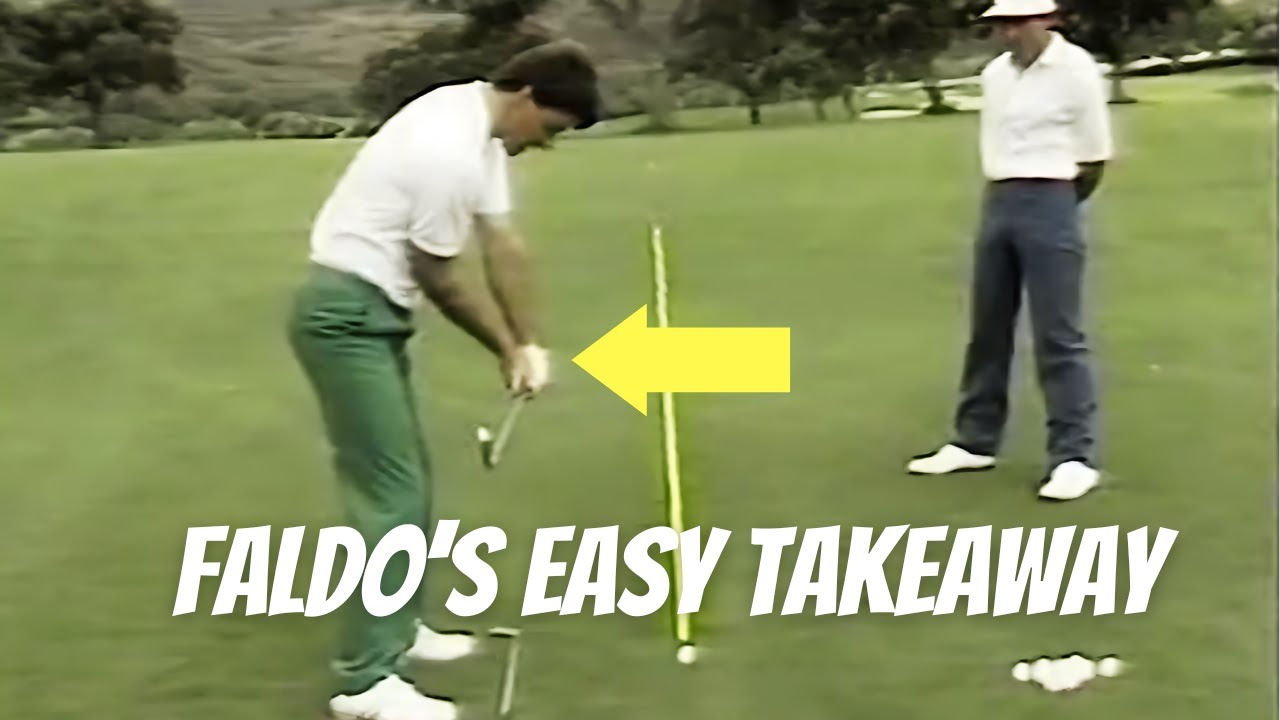
08:35 Takeaway
11:05 Backswing
11:47 The Preset Drill
I’ve put together a series from an old Nick Faldo VHS golf lesson this is video one of four as Nick walks through his swing rebuild with his coach David Leadbetter I hope you enjoy it. Over the previous two years working with my coach David Leadbetter I had changed my swing completely in
An effort to make myself a more consistent player Dave and I spent many hours on the practice ground working on my swing this program will enable you to learn our philosophy and see how we approach a round of golf we traveled to southern Spain to Valderama where we play the Volvo Masters the
Last event on our European tour but let’s start at the beginning and as we all know good golf starts with a good grip with David’s help what we’re simply trying to do is unite the hands on the
Club keeping the club face Square now as you see David has drawn a few lines on this glove here to give you a a better indication exactly where we’re trying to put the hands as you can see
The left hand is pretty much a palm grip it lies diagonally across the Palm this is indicated by these two lines here on the glove and it’s placed across the palm and through the first finger now
As Nick grabs his hand around here we’ll notice that the V formed by the thumb and the forefinger the line indicated here points very much towards his right shoulder so very important to get that left hand position correctly on the club and as you can see with these lines what these indicate
Are that Nick can see two Knuckles on his left hand very important for the club golfer to have at least two Knuckles showing on this left hand yeah I think initially a couple of years ago my
Grip was a little bit too weak right and this uh by moving it to the left as you can see my thumb is directly on top and this causes poor takeaway and bad rotation of the arm so it’s important to
Feel that you’re just a little right of Center nice comfortable position there then we apply the right hand right now the right hand is pretty much a finger grip and as you can see as we place
The right hand on here it lies across the base of the fingers here the Shaft lies right across the base wrapping the right hand on top there you can notice the the thumb of the left hand fits pretty
Much into the pad the meaty pad of the right hand here if we can just open this we can see it lies right under the thumb joint here and as Nick places his hands on the club there there’s
A little Gap if we can notice between the first finger and the second finger this little Gap is important because it helps to join the thumb and the finger together this just keeps the pressure
Consistent and now as we can see the hands are a unit on the club yeah I personally feel I try to keep an even pressure all through my fingers and mas I said very important keep it nice
And relaxed so you can have this movement all the time through your swing You’ got to have freedom you don’t want to be rigid there we go nice and relaxed so really to summarize we will we’ll see
If the hands are set correctly on the club the club face will then be squared at impact there is a choice that we have as far as where we place the little finger of the right hand now
The most common grip as Nick grips it is the what we term the overlapping or the Vardon grip where the little finger just sits on top of the index finger this is most commonly used by most players
On the tour but there also is the other group The interlocking grip which say Jack Nicklaus uses and um this generally speaking is used for people with very small hands we recommend that for maybe Juniors or ladies and then there is the third Group which is not very common
These days which is the two-handed or baseball grip as they term It in America where the right hand just sits beneath the left hand basically we’re trying to get the hands working as a unit so I think the most comfortable grip is the one with the little finger just sits on top
There and it just rides piggy back we want to stress that it’s it’s so important to spend a little bit of time on your grip it may feel very uncomfortable to start with we if you could just
Go out and hit a few balls each day 20 balls not worrying where they go get your grip in the right position then the feel will come and if you can do this it’s going to help your game
Tremendously having now got your grip right the next step we got to take is getting your your stance alignment and posture correct now the simplest way we can sort of uh explain this is to imagine your alignment as a railway track and the outside rail is the the is your target
Line going through the ball to your target which we’ve indicated with an umbrella to make life a little easier for the camera and you are going to stand parallel on the inside track so the alignment is not actually pointed at the Target but is parallel to your target line let me just
Check this first so it’s now running what I would imagine to be a little bit left to Target but only fractionally which is going to get you now in the right position this is the easiest way you
Can work on this on the practice ground put the club down and now we’ve got the base to work on which is can get our body in the right position let’s work from the feet up we want a nice Square
Stance about shoulder width apart not we don’t be too narrow because obviously it’s going to cause a lot of swaying and the important thing with your your toes and the feet are if you were to stand naturally you’ll be You’d be square so to make life easier on the follow through we want
To turn out the left foot just fraction to give you the freedom to let this knee work and again we don’t want to on the back swing we don’t want to restrict the the turn of the right knee so we
Just let that open just a little bit right now we’ve got our feet positioned let’s go on our body alignment and the most important thing what we’re trying to do is get every part parallel to our Target line here so we start with our knees we want these level but then they’re probably
The most important area is your hips you see how I want these in line which is going to really in uh pull the shoulders into the correct position quite often people worry a great deal about the shoulder position but in fact if your hips are slightly out of line you can see how
They’re pulling slightly left that’s going to automatically pull my shoulder line again now pointing left obviously the other way if we a little bit shut the hips are pointing to the right of Target automatically going to pull the shoulders online it’s impossible to not move these
Two or move these two independently so we’ve now got our body as you can see aligned correctly our weight distribution is is nice and even between the feet now what I want you to try and do to
Get the right body posture is to just stand tall and then flex your knees so in a nice comfortable position and what we’re trying to do is get the weight evenly down through the knees and into the
Balls of the feet here so as a guide as I look down I’ve lost the vision of my laces and that sort of thing I don’t want to go too far where I can’t even see my shoes I’m here nice comfortable
Position now the next important thing is tipping the waist forward now if we go too much from the waist we create a a rounded back which is a stoop position very difficult to turn so where we want
Actually want to bend from is from the hips again keeping the small of our back nice and straight we can then tip ourselves forward there into a nice comfortable position where the arms hang nice and freely and another little guide if you’re about a hands width away from your
Your left leg there you’ve got your hands in a a nice position so there we go there’s the basics David will now run through probably some of my old faults I think well very simply Nick
Used to have too much weight back on his heels here and very open with the hips there so what we did obviously was propped him up to a position where yeah the right foot was very Square so we’ve
Pointed that out a little bit there much easier to get your body turning in both directions if you have your feet pointed out so what we simply did was actually get the weight further forward in Nick’s stance more towards the balls of his feet got his behind stuck out a little bit you
Can see his back is nice and straight if you just grip the club there Nick see his back is nice and straight his chin is up too you don’t want to get your chin too low because this allows your
Shoulders to turn freely by having the chin up and very important very important which most Club golfers should really try to follow this point the arms need to be relaxed we cannot overstress that the arms need to be relaxed you don’t want to have any tension in your
Arms now we’re going to move into the takeaway as it’s commonly refer to or the moveaway as I refer to it very important in getting the club moving away to make sure that things move together remember we’re setting things up for the rest of the Swing the golfswing is basically
A chain reaction so everything happens from here so in moving the club away here you’ll notice how Nick moves everything away together his middle his Naval and the club move in one piece away together there for the first few feet you’ll notice how everything turns together his chest
Is now turning and basically his Naval is still pointing at the golf club now it appears that the club face is actually open but in actual fact it has just simply moved with his turn
You’ll notice as if he turns and faces the golf club right now you’ll see that the club face an actual fact is in the same position as it was at address so remember staying nice and relaxed here
The body moves the club away rather than the hands and arms initiating everything we try to get the body moving the club there we go yes we get him here and what we’re trying to do with the weight
As David said is resist here we don’t want any lateral Movement we don’t want any swaying at all here what we’re trying to do is actually turn and let the weight feel as if it’s coming
Backwards behind us here now a simple tip to make this a lot easier for you is to put the the grip of the club right into your belly button there now if you cheat on it and just use your hands
And arms you can see it comes right away so what we want you to do is turn the stomach there and pulling it into one position and as you can see the club is perfectly Square I can put the club
Back down on the ground and I could re retake my stance here Square so we’re not trying to roll it or fan it or take it shut in any way we’re using the body to pull it there into the right position
This also in getting the club moving we can see the right shoulder has started to move behind Nick the right hip has started to move and certainly the weight has started to initiate its movement
To the right side one of the problems that Nick used to have in his golfswing was moving the club away purely with his hands and getting the club face very shut and also moving the weight to the
Outside of his right foot so very important to move everything away together so if Nick turns now and faces the golf club he is basically in the same position as he was at address okay so we can get Nick to move the club away to the first stage of the back swing
Now we’re in a position really where the club continues simply what happens from here the right shoulder turns the right elbow folds and the right wrist really hinges so now you can see at this point here we’ve got the wrist almost fully cocked when
The left arm is parallel to the ground now as Nick continues his right shoulder turning the weight moves into the right side the back is facing the Target and he has wound up the big back muscles here really coiling himself ready to come back to the
Ball one great practice drill David gave me was what I would call it a preset position where after I’ve taken my address I preset this this wristcock so the club is parallel with the line and also parallel with the ground so I have completed the wristcock I don’t want to be here or
Too far down set it completely now simply all I do is turn my right shoulder behind me but resisting with my right knee I don’t want anything else to fold back with it so pulling back with the the
Right shoulder as you can see I’ve completed the back swing in a perfect position just quickly run through that again set the wrists so they stay in front of me there parallel and on and on line now just turn the right shoulder into that position I’ve resisted here and the other very important
Factor is I’ve kept my spine straight so it keeps me in a very good position maybe David you want to run through a couple of little things on that as well yes I think it’d be very important to
Mention here you can notice at the top of Nick swing there this is one of the myths of the golf swing that we like to uncover a lot of people try to concentrate on a straight or stiff left
Arm now you can see Nick’s left arm is fairly straight but it is not stiff there’s no tension here so that’s something that you want to really try to work on is relaxing the left arm because
Remember if you get your arms too far away from your body you’re putting all the emphasis on your hands and your arms and the other thing really to mention is the fact that Nick has maintained
His spine angle that he had at a dress there you can see the angle at his waist there is exactly the same as it was at a dress there’s no lifting or raise or dropping of that angle so as a result
Of that his shoulders have turned on a relatively flat plane this is one of the things that we’ve changed in the next go s he used to have a very tilted shoulder turn now he has a much flatter
Shoulder turn and is able to get the club in a much more consistent position at the top this is something you can do practicing you can take a 9 iron and just work on this setting action
Turning the shoulders and I I want to tell you knowing that you’re getting the the back swing in the correct position every time is great for your confidence that’s it for part one the next
Video will be on the downswing as well as Nick’s best golf drills click on this video for part two when available I’ll include links to all parts in this series in the description thanks for watching

1 Comment
This is really fabulous instruction. How often will you be bringing out the remaining 3 segments?