Most golfers try to fix impact by changing what happens at impact — but the real secret starts much earlier.
In this video, I’ll show you the backswing move that every pro makes (even if they don’t realise it) and why missing it will destroy your ball-striking consistency.
You’ll also see a simple but unique drill using a golf ball that instantly helps you feel the correct sequence and pressure shift — it’s one of the most effective training feels I’ve ever used in lessons.
📍 What you’ll learn:
The subtle move in the backswing that sets up perfect impact
Why most golfers never feel this move — and what happens when you do
How to use the “ball drill” to fix strike and direction in minutes
A clear visual of how the pros create compression and control
📲 The Chris Ryan Golf Academy App
The all-in-one coaching platform designed to help you train smarter, practice better, and play your best golf! 🎯
✅ Structured training plans
✅ Fun & effective practice games
✅ Exclusive content not on YouTube
Start your 7-day free trial today! ⬇️
🔗 https://www.chrisryangolf.com/chris-ryan-golf-academy-app/
⛳ Want to Play Better Golf?
Join me on the journey to lower scores and more enjoyment on the course! Don’t forget to LIKE, COMMENT & SUBSCRIBE for weekly golf coaching videos.
💬 Got a question? Drop a comment below – I read them all!
📩 Want to work with me? Email: chris@chrisryangolf.com
🌍 Visit My Website: www.chrisryangolf.com
🎥 Want Personal Online Coaching?
If you’re serious about improving, I offer personalised online coaching to help you reach your goals faster.
🔗 https://www.chrisryangolf.com/online-coaching/
🤝 My Trusted Partners
🔥 TaylorMade Golf – https://www.taylormadegolf.eu
🏌️♂️ Clubhouse Golf – https://www.clubhousegolf.co.uk
🎯 Hack Motion – https://www.hackmotion.com/chrisryan
📡 FullSwing – https://www.fullswinggolf.com
📱 SwingCoach – https://inf.getswingcoach.com/CHRY232
🎯 PuttOut Golf – https://www.puttout.golf
👟 Adidas Golf
🔧 Mapei – https://www.mapei.com/GB-EN/
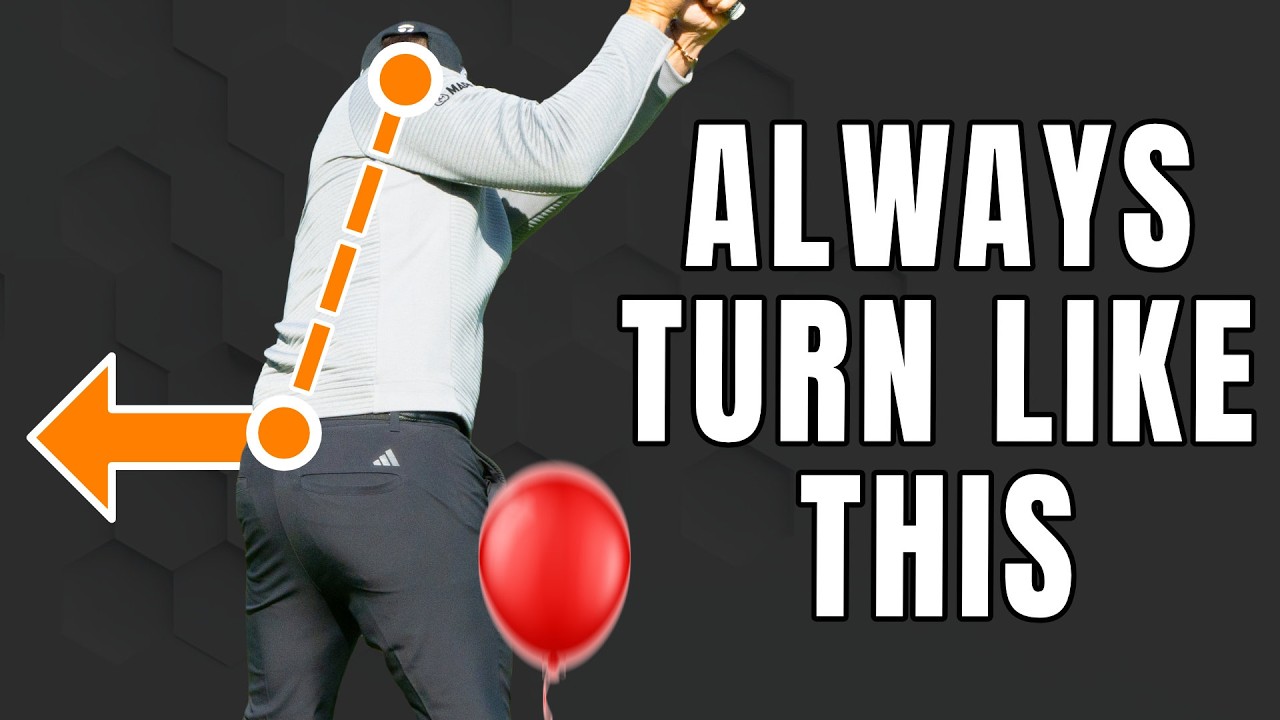
The drill I’m going to show you in this video with this ball has transformed the ball striking of so many of my students. So I know that it can do the same for you. When we look at ball striking, the low point of your swing has to be target side of the ball. That’s what we see the great players do. Now every golfer through their golf swing is moving their swing circle around relative to the ball. We’re all doing that. What great players do is they have this subtle movement in their midsection that they do which almost guarantees that the low points are going to be target side of the ball. Here are some great players. You’re going to recognize all of these players. And what we’ve done here is we’ve marked the outside of their leg, their trail leg gets set up and then at the top of the back swing. And what you’ll see with all of these players is that that trail hip is slightly closer to the target at the top of the back swing when compared to where it was at the setup. It’s subtle, but it’s present. And it’s a key movement that they make to help them with that low point. So, here’s that drill with that ball to help you feel and sense it. So, I really want you to grasp an understanding of this. And then we’ll talk about how it’s actually tilting the spine very slightly to get them into that perfect position. So, grab yourself a board. I’d love you to try this because it’s really going to give you the feels that I want you to have. Now, it’s got to have some kind of movement or play to it. This would be ideal. It doesn’t need to have T-Rex on it. If it does, it’s even better. And what you can do is you can find yourself a wall or a surface. And as I stand against that, I want to take this ball which has got some kind of movement in it and just pop it between that wall and my trail hip. And then just get yourself into kind of, you know, golf posture. And what I’d love you to do is just make a back swing and move through a full rotation. What we’re looking for here is as you move your shoulders through around about half of their rotation, it’s absolutely fine to put a little bit more pressure on that ball and actually squash that ball a little bit. So, as I move my shoulders through half of their rotation, I actually squash that ball a little bit because that’s me moving into my trail side. But when I complete that rotation, the ball drops and that would be what we looked at with those really high elite players that we saw. So, what many of you will do naturally, especially those who are trying to load into the right side, trying to get to the right side, you might find that you actually keep that ball in place. Now, we’ve already looked at the best players in the world. That’s not what they do. So, that’s going to give you that information straight away. Alternatively, when I work with students and we talk a little bit about the hip movement, sometimes we’ll see this where it’s almost too much in that direction and because it’s too much and too early, they often reverse it as they start down. So, I’d love you to almost feel initially that this is two movements. This is almost a squash the ball, drop the ball. And what that’s teaching you to do is move pressure early. Great players move pressure early and then move the hips in that very specific and subtle way that’s going to help with your ball striking. So as we start to go squash and then we would start to drop the ball, we can then start to blend it together. So it would be squash, squash, squash, drop. And that is such an incredibly powerful drill because it’s going to show you what to do, but it’s gonna be really easy for you to figure out what the wrong movements are. And then we can look at how we introduce the golf club to that. Once you bring the golf club back in, you can make that same movement. So visualize that ball or that balloon. And as you make your takeaway, you would slightly squash it before you would drop it. And that gives us that perfect midsection that we see the best players in the world do. Now, when we look at the golf swings from face on, we often hear the term of staying centered or staying over the ball. But actually, when we do this correctly, there’s a slight tilting of the spine, which is crucial when it comes to ball striking. To see that, we’re going to use a different view. So, from behind, we’re going to mark the top of my spine and my tailbone. And you can see I’ve got an alignment stick here to to sort of reference that. And as I’m making that movement, the tailbone actually moves slightly closer to the target. and the upper part of my spine that’s on my neck is staying fairly centered. So that spine is actually tilting very slightly. Now it’s a subtle movement, but it is vital if you want to get that low point target side of the ball. So if you’re someone who, you know, has got a sway, that’s going to be so difficult for you to get perfect contact. Or maybe you’re someone who drifts the head too much off the golf ball. Both of these are really common. And both of these are back swing movements that make down swing incredibly hard to get right. Now, in a moment, we’re going to cover how you would apply this to both irons and drivers on the golf course. But once you’ve done that little rehearsal, you’ve got that feel, I’d love you to go ahead and hit some shots. I’ve got eight iron, so relatively short club with some loft. And the initial way I want to hit the golf ball is take a setup. You can tee it up if that would be easy for you. And you’re going to make your takeaway. and before the club reaches level with the ground. So you can see that that’s my checkpoint there. I want to felt like I’ve put some weight or some pressure under my trail leg. That would be me squashing the ball. So I’m going to go takeaway, squash the ball, back swing, drop the ball. Now breaking it down initially is great to understand when these things are happening. The golf swing isn’t a stop start movement. It’s a continuous movement. So I appreciate we want to get into that relatively quickly. But if you’re someone who’s really struggling with ball striking, doing that drill against the wall, then breaking it down is really key because it’s building up to obviously those four swings. So we would say squash it, drop it, swing through. And even though I’m doing stop start swings, it’s very difficult for me to land the club behind the ball. It’s always going to be target side of the ball. And I’m not taking divots because my speed isn’t quite where it needs to be for a divot, but I’m starting to get that low point this side of the golf ball. Then when you feel more comfortable, there’s no reason why you can’t just go ahead and put that together. But why not have a little rehearsal? There’s that little bump. Squashing the ball. Squash it. Drop it. And we start to get the contact. Now, if you come a little bit closer, there’s no divots here because the ground’s fairly firm. But this is where my golf ball was. And of all of those shots, not once has my club landed this side of that line. All of the shots, hopefully you can see that my club has been landing over here. And if we get that little visible sort of reference on the ground, we know that that low point was target side of the ball. And when the low point is target side of the ball, guess what? Your ball striking is where it needs to be. Now, a lot of times when I do these videos on low point, the comments are a lot about driver. How do we apply it to driver? Let’s go through that. We’ll come to driver in a moment, but I want to I want to cover driver and how it would be different to irons in a really really simple way. I want to make it easy for you to take this to the golf course. When you’re hitting your iron shots, what I would love you to do is visualize on the outside of your lead foot a wall. So, there’s a wall there, and you can see that my shoulder is relatively close to it. Maybe it’s touching it. As I make a back swing, the correct back swing that we’ve just taught you, the lead shoulder is now being pulled back away from that wall. But as we make the right movement till we transition into our lead side at impact, we really want to feel like we’ve reconnected with that wall. So my lead shoulder now is against that wall. Depends how creative you want to get, but I would almost have the feeling of having some almost paint on your shoulder. So you can have see some sort of paint here. And I’m trying to wipe that paint onto the wall. And the reason I like that is because we’re not trying to just continually slam into the wall. We’re actually trying to sort of get to the wall and then drag it. So, we’re almost trying to smear that paint onto the wall. Now, driver, we’re probably going to get attack angles which are a little bit too negative, a little bit too much down. So, when I set up with driver, we’ve got that same wall there. I can still have the same movement in my hips. I can still have this bump where I squeeze. I can then still have this movement away. But the key thing would be on the way down, I’m trying to keep my lead shoulder back from that wall. And you can see how I’m doing that. So yes, my midsection is moving forwards, but because my shoulder is away from that wall, that gives me a little bit more upper body tilt. And it helps me still move the pressure forwards, but create a body angle which is going to be more conducive to an upward hit. If we get the same movement happening, if we get that lead shoulder crashing into that wall, you’re going to find it very difficult to launch the driver. you’re going to start to need 12, 13 degrees of loft because you’re going to have an attack angle which is a little bit more down. So when I’m with driver, still still visualizing that wall, still visualizing the right movement, but I’m trying to keep my upper body and my lead shoulder away from that wall. So if I hit driver, we should see a very very different movement through impact.



3 Comments
First! Great video as always.
To simplify, your point is this. In the takeaway, where the club shaft is just below parallel, you "crush" the red soft ball against the wall/pole. At this point in your takeaway, the base of the spine "points away" from the target relative to its position at setup.
As you swing to the top of your backswing, the right hip then "moves away" from the wall/pole on the right, and the red ball "drops." At this point, the base of your spine points closer to the target relative to its setup position.
Moving the base of the spine like this (back & forth) in the backswing is the correct sequence you're describing for ball turf contact.
Excellent insight as usual. I understand some of the best coaches refer to this move as the RECENTER move. Starts with a slight subtle shift away from the target, then before you complete your backswing the pressure is moved back into the centre. Your insight on the fact the tail bone moves closer to the target by the top of the backswing / start of the downswing is really valuable. I’m assuming this comes about by your hips shifting diagonally closer to the target, as the lead arm
passes parallel to the ground. This would help to start to shift the pressure back towards the target. Please could you clarify is this achieved by a diagonal / lateral shift of the hips closer to the target? In other words it’s not purely achieved by hip rotation?
Myles